
Spring Fence Basket
This post was originally posted on my blog Ordinary Life Magic.
These little boxes are perfect for holding found spring treasures, or for colored eggs, to welcome Ostara.

I have a wooden box that I purchased that looks like a fence.
Every since I bought it, I've been thinking on how we could make one... I think handmade ones would be darling on the spring nature table. I picture them holding painted eggs or little nests, pretty rocks, bits of moss... whatever we find during our springtime nature travels.
Our materials were popsicle sticks (craft sticks, if you insist), paint, hot glue, craft glue, salt, flour, and flowers.
Our tools were a glue gun, sponge (for painting), and wire cutters.
First we cut popsicle sticks in half with the wire cutters. Ours went flying, so be warned. Maddie had fun collecting them.
Lay them out the width of a whole popsicle stick, and use a stick to line up the bottoms. We used five or six 1/2 sticks per side.

Place a dot of craft glue on the broken sticks where you want the cross fence-post to go,
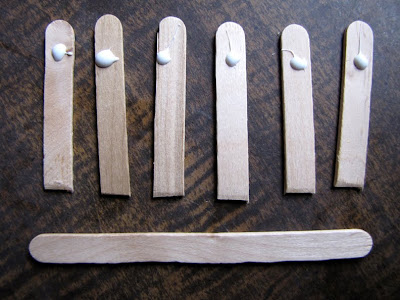
and add the stick to bind them together.
 Let it dry completely.

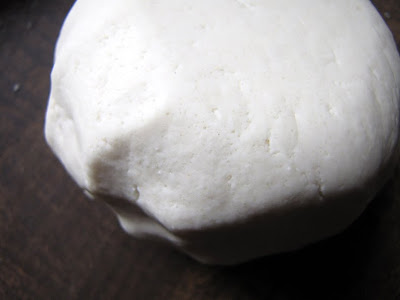
For our base, we found a baker's salt dough to be efficient for a heavy, sturdy bottom.
I needed a thick bottom of clay so the fence and the bottom of the box connection would be strong. You could use air-dry clay for this, but I wanted something that most people would have on hand, and that wouldn't be so expensive.
The salt dough recipe we used was two cups flour, 1/2 cup of salt, and about 2/3 cup of water. This made three thick square bottoms for our boxes.
Add more water if needed for a smooth, consistent dough. Certainly you don't want it crumbly.
We rolled out the dough, and for the first bottom, I placed the four fence walls actually into the dough, to mark the size needed for the bottom.
I placed a piece of paper over it, lining up one corner, and marked the size, and then cut it out. This I then used as a template for the bottom of all three boxes.

We rerolled the dough, and then cut out the bottoms, tracing around the paper with a butter knife.
I picked up the dough with a flat spatula, then placed the bottoms on a cookie sheet.
You could let them air dry certainly. I chose to bake them - doing so at 300 for about an hour.
Mine rose just a little, so when I took them out, I placed them under heavy books to flatten them a little while they were still warm.
We mixed our acrylic paints, and then painted the bottom,
as well as the finished fence pieces.

I placed a dot of hot glue at the bottom of each fence board, and then lined it up at the sides of the bottom, doing this at all four sides.
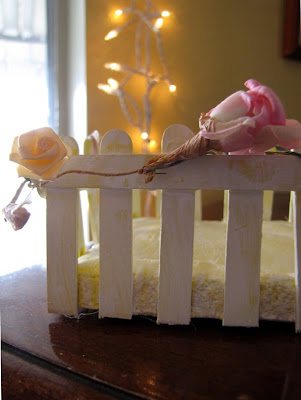
I wanted my box to have a white-washed finish, so I mixed white acrylic paint with water, and gave my box a quick once-over.
When it was dry, we added our embellishments.


Pretty, I think.
These little boxes are perfect for holding found spring treasures, or for colored eggs, to welcome Ostara.


I have a wooden box that I purchased that looks like a fence.
Every since I bought it, I've been thinking on how we could make one... I think handmade ones would be darling on the spring nature table. I picture them holding painted eggs or little nests, pretty rocks, bits of moss... whatever we find during our springtime nature travels.
Our materials were popsicle sticks (craft sticks, if you insist), paint, hot glue, craft glue, salt, flour, and flowers.
Our tools were a glue gun, sponge (for painting), and wire cutters.
First we cut popsicle sticks in half with the wire cutters. Ours went flying, so be warned. Maddie had fun collecting them.
Lay them out the width of a whole popsicle stick, and use a stick to line up the bottoms. We used five or six 1/2 sticks per side.

Place a dot of craft glue on the broken sticks where you want the cross fence-post to go,

and add the stick to bind them together.
 Let it dry completely.
For our base, we found a baker's salt dough to be efficient for a heavy, sturdy bottom.
I needed a thick bottom of clay so the fence and the bottom of the box connection would be strong. You could use air-dry clay for this, but I wanted something that most people would have on hand, and that wouldn't be so expensive.
The salt dough recipe we used was two cups flour, 1/2 cup of salt, and about 2/3 cup of water. This made three thick square bottoms for our boxes.
Add more water if needed for a smooth, consistent dough. Certainly you don't want it crumbly.

We rolled out the dough, and for the first bottom, I placed the four fence walls actually into the dough, to mark the size needed for the bottom.
I placed a piece of paper over it, lining up one corner, and marked the size, and then cut it out. This I then used as a template for the bottom of all three boxes.

We rerolled the dough, and then cut out the bottoms, tracing around the paper with a butter knife.
I picked up the dough with a flat spatula, then placed the bottoms on a cookie sheet.
You could let them air dry certainly. I chose to bake them - doing so at 300 for about an hour.
Mine rose just a little, so when I took them out, I placed them under heavy books to flatten them a little while they were still warm.
We mixed our acrylic paints, and then painted the bottom,
as well as the finished fence pieces.

I placed a dot of hot glue at the bottom of each fence board, and then lined it up at the sides of the bottom, doing this at all four sides.
I wanted my box to have a white-washed finish, so I mixed white acrylic paint with water, and gave my box a quick once-over.
When it was dry, we added our embellishments.


Pretty, I think.


Comments
Post a Comment