
Nature Egg

In a conversation with a friend, I told her that I wanted to make panoramic eggs. I also mentioned that I wanted to make more nature-themed ones, but that I thought it would be a silly thing to do with sugar eggs.
Every since I said that, I've been thinking that I really wanted to figure out a way to do it.
I used air-dry clay (mine is a natural, earth clay), grass from our yard, tacky glue, a little bird from the craft store, a couple of small snips from a bush (with earliest spring buds), and a large, plastic easter egg.
If you have egg molds, or a shell that opens length-wise instead of across - lucky you! Use these halves for molds.
If you have the regular eggs that open into the top and bottom half of the eggs, then you can still use it, with some care and patience.
First I taped the plastic egg together, so I wouldn't squeeze it apart.
For the egg shape, I just pressed bits of clay onto the entire egg.

When I felt it was covered evenly, I gently rolled it back and forth around on my table, making the egg as smooth as I wanted it to be.


With a butter knife, I cut around the egg, dividing it into top and bottom halves,
then I wiggled the knife back and forth between the top and bottom halves, flattening the edges.

I let it dry for quite a while - to hurry it up (I'd been trying different ways for two weeks to make eggs, and at this point wanted to accomplish something! :) ) I put on the lowest setting in my oven - 175 degrees, and placed the egg in there. (It's cool enough that it doesn't melt or soften the egg inside the mold.)
When I thought it was dry enough for prying away from the mold, I set to the task.
It was still soft enough for prying (a bit pliable, still), but not as wet and sticky.
First I pushed the very edges away from the egg with my thumbnails, making my way around the egg, then when the very edges were away from the plastic, I started prying it with a butter knife, loosening it from the mold.
After much patience and care, it was off from the plastic egg.

(If you have a mold, just wait for it to dry, some, then pop it out of the mold.)
Cut a bit from the pointed end for viewing,
and put your halves together to make sure their shapes match up pretty well before you leave them to harden.
Let the eggs completely dry - from 24-48 hours.

If you want your edges smooth and matched, then you can carve them with tools or a knife to match your top and bottom halves. It wasn't necessary for the way I was doing mine, as I wanted a flower rim.

If you want your eggs painted pretty spring colors, then now would be the time to do that. If you'd like it to look sugary, then put a clear (white) glitter over the paint. This will also get rid of any marks (scratches or creases) on your clay.
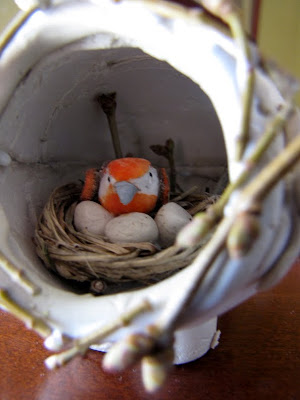
I collected bits of last year's grass from our lawn, then wound it around and around to make the shape of a nest.

To keep it together after it was formed, I put some tacky glue on it and worked it in to hold the nest together.
I cut little tiny stems from bushes, and placed a bit of soft clay inside my egg, and put my little branches into the clay bits.
I made tiny eggs out of clay for the nest.
I assembled my things in the bottom half of my egg, placing them and then gluing them to keep them into place.

When I was done, I rimmed the bottom half of the egg with tacky glue, then put the top half on.

To further seal the egg, and to decorate it, I made a long rope to tuck into the space between the top and bottom of the egg, and to also give my flowers something to stick to.
I found the quickest and easiest way to make the flowers was to make a long rope of clay, then tear off little tiny bits at a time for petals. Then I placed a tiny ball of clay in the center of the petals, finishing the flower.
For the front rim (the opening of the egg), I made another rope to give it an even finish, then glued tiny sticks with blossoms around the opening.
 So, so sweet.
Welcome, Spring!


Comments
Post a Comment